Difference between revisions of "Four Gas Detector"
Zarvanitis (talk | contribs) (Add configuration info, including hackery) |
|||
| (3 intermediate revisions by 2 users not shown) | |||
| Line 21: | Line 21: | ||
*Carbon monoxide is flammable at between 12.5% and 74%. We see this when smoke 'flashes over' in house fires. That works out to a flammable range of approximately 125,000PPM to 740,000PPM. | *Carbon monoxide is flammable at between 12.5% and 74%. We see this when smoke 'flashes over' in house fires. That works out to a flammable range of approximately 125,000PPM to 740,000PPM. | ||
*Carbon monoxide binds to hemoglobin in our blood and prevents the blood from carrying oxygen from our lungs. The carbon monoxide binds more strongly than oxygen, so even after leaving the exposure area it can be some time before oxygen levels return to normal. Symptoms of CO poisoning include tiredness, headache, and flushed face. It is essentially oxygen deprivation. Suspect CO when in confined spaces especially when you have multiple patients. | *Carbon monoxide binds to hemoglobin in our blood and prevents the blood from carrying oxygen from our lungs. The carbon monoxide binds more strongly than oxygen, so even after leaving the exposure area it can be some time before oxygen levels return to normal. Symptoms of CO poisoning include tiredness, headache, and flushed face. It is essentially oxygen deprivation. Suspect CO when in confined spaces especially when you have multiple patients. | ||
'''Note:''' Our pulse-oxymetry devices cannot tell the difference between bound oxygen and bound CO. If | '''Note:''' Our pulse-oxymetry devices cannot tell the difference between bound oxygen and bound CO. If the pulse-ox is giving a very high reading (near or at 100%) CO poisoning should be suspected. | ||
*Low alarm set-point: 35 PPM | *Low alarm set-point: 35 PPM | ||
*High alarm set-point: 70 PPM | *High alarm set-point: 70 PPM | ||
| Line 27: | Line 27: | ||
This measures the amount of flammable hydrocarbons in the air and displays it as a percentage of the LEL. A reading of 0% LEL suggests no hydrocarbons while 100% LEL is an environment where the gas has just reached its lower flammable range. | This measures the amount of flammable hydrocarbons in the air and displays it as a percentage of the LEL. A reading of 0% LEL suggests no hydrocarbons while 100% LEL is an environment where the gas has just reached its lower flammable range. | ||
Different gases are flammable in different ranges. The detector | Different gases are flammable in different ranges. The detector measures methane/natural gas (CH4) which has a flammable range of 5-15% by volume (not 5-15% LEL). | ||
*Low alarm set-point: 10% of LEL | *Low alarm set-point: 10% of LEL | ||
| Line 66: | Line 66: | ||
# Select 'Calibrate' and press return. | # Select 'Calibrate' and press return. | ||
# Select 'Yes' on 'Are you sure?' and press return. | # Select 'Yes' on 'Are you sure?' and press return. | ||
'''Error handling''': In some cases, calibration may take longer than usual and then display “Calibration error.” If this occurs, remove the detector and power it on - likely it will beep at you and notify you that one of its sensors is no longer working. In this case, notify an officer, who will likely pull it out of service until we can order a replacement sensor and replace the malfunctioning one. (One of the things we love about this specific gas detector is that the sensors can be individually replaced as needed and with very little effort.) | |||
== Configuring the detector == | |||
WARNING: do not do this without express permission from an officer. You can make changes that could be quite dangerous to yourself and your fellow volunteers. | |||
=== Help! It's not reading gas levels === | |||
Symptom: instead of reading gas levels after turning on, the detector just shows four lowercase Bs. | |||
Reason: the detector likely has a bump test frequency set, and it's set to a maximum of 7 days. After that time, it refuses to read gas levels until it's bump tested. This is infuriating. | |||
Fix: See the manual for how to configure the detector. Specifically you'll want to set the bump test value to zero instead of one. | |||
=== Help! I can't configure because a passcode is set === | |||
You can remove the passcode by entering 421 for the passcode (press and hold to increment by 10 at a time instead of one), then ''instead of entering the passcode'', press and hold both the on/off button and the enter button for a second. It will remove the passcode and reset the detector to factory default settings. Now you can configure the detector as needed. | |||
== Manual == | == Manual == | ||
The instruction manual can be found here: | The instruction manual can be found here: | ||
[[File:Ventis MX4 Product Manual.pdf|thumb]] | [[File:Ventis MX4 Product Manual.pdf|thumb|left]] | ||
Latest revision as of 02:24, 13 June 2023
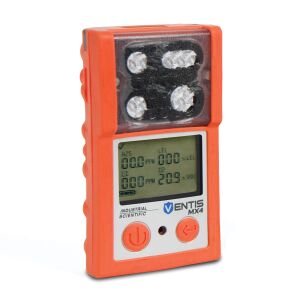
MEFD uses Industrial Scientific Ventis MX4 gas detectors. These detectors are easy to use. They provide measurements of oxygen level, carbon monoxide, hydrocarbon lower explosive level, and hydrogen sulfide in the air. They are not leak detectors. The detector will alert (alarm, flashing lights, vibration) when limits of any gas are exceeded. They also record peak values detected for each gas.
The detectors are kept in chargers on 11-12, 11-17, 11-21, and 11-24.
What Is Being Measured
Oxygen (O2)
This is the amount of oxygen in the air. At sea level we expect an oxygen level of about 20.9%. A level lower than that indicates the oxygen is being displaced by another gas. The gas displacing the oxygen may or may not be detected by the gas detector. Any drop in oxygen level is cause for concern and requires the use of SCBA.
- Low alarm set-point: 19.5%
- High alarm set-point: 23.5%
Carbon Monoxide (CO)
Carbon monoxide is an odorless, colorless, gas that is often the result of incomplete combustion of fossil fuels. We find CO in house fires, faulty furnaces, and car exhaust. CO is slightly less dense than air, but because it is so close in density it will mix with the air in a room.
The detector reports CO in PPM. A reading of over 35PPM is considered dangerous.
Carbon monoxide is dangerous for at least two reasons:
- Carbon monoxide is flammable at between 12.5% and 74%. We see this when smoke 'flashes over' in house fires. That works out to a flammable range of approximately 125,000PPM to 740,000PPM.
- Carbon monoxide binds to hemoglobin in our blood and prevents the blood from carrying oxygen from our lungs. The carbon monoxide binds more strongly than oxygen, so even after leaving the exposure area it can be some time before oxygen levels return to normal. Symptoms of CO poisoning include tiredness, headache, and flushed face. It is essentially oxygen deprivation. Suspect CO when in confined spaces especially when you have multiple patients.
Note: Our pulse-oxymetry devices cannot tell the difference between bound oxygen and bound CO. If the pulse-ox is giving a very high reading (near or at 100%) CO poisoning should be suspected.
- Low alarm set-point: 35 PPM
- High alarm set-point: 70 PPM
Lower Explosive Level (LEL)
This measures the amount of flammable hydrocarbons in the air and displays it as a percentage of the LEL. A reading of 0% LEL suggests no hydrocarbons while 100% LEL is an environment where the gas has just reached its lower flammable range.
Different gases are flammable in different ranges. The detector measures methane/natural gas (CH4) which has a flammable range of 5-15% by volume (not 5-15% LEL).
- Low alarm set-point: 10% of LEL
- High alarm set-point: 20% of LEL
Hydrogen Sulfide (H2S)
Hydrogen sulfide is a colorless gas that smells like rotten eggs. It is both highly toxic and highly flammable. It is heavier than air and tends to pool in low places.
It causes eye irritation at the 10-20ppm level and can begin causing eye damage at 50-100ppm.
- Low alarm set-point: 10 PPM
- High alarm set-point: 20 PPM
Note: At 100-150ppm or higher you lose your sense of smell and may not be aware the gas is present.
Using The Detector
- Press and hold the power button for 3-5 seconds.
- Wait for the detector to go through the 20 second countdown and to get to the ready screen (displays all 4 gas levels).
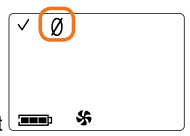
- Zero out the detector.
- Press the power/mode button multiple times until you get to the Zero screen.
- In open air away from suspected hazards and apparatus press the enter button to begin the zero process.
- If you get a check mark the zero passed. If you get an exclamation point it failed. If the zero process fails the repeat the zero process.
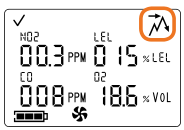
- Clear out the peak readings
- Press the power/mode button until the peak readings screen is shown.
- Press the enter button to clear the peak values.
- Power off detector by pressing and holding the power button for the duration of the countdown (5 seconds). It is normal for it to beep and flash.
Calibrating The Detector
Note: The Ventis MX4 gas detectors should be calibrated once a month and after significant exposure.
- Setup the DSX docking station.
- Place detector in docking station, face forward. The orange light below the detector should light.
- Close the lid.
- Let docking station go through automatic bump test.
- Press the return button on docking station (center, bottom).
- Select 'Instrument' and press return.
- Select 'Calibrate' and press return.
- Select 'Yes' on 'Are you sure?' and press return.
Error handling: In some cases, calibration may take longer than usual and then display “Calibration error.” If this occurs, remove the detector and power it on - likely it will beep at you and notify you that one of its sensors is no longer working. In this case, notify an officer, who will likely pull it out of service until we can order a replacement sensor and replace the malfunctioning one. (One of the things we love about this specific gas detector is that the sensors can be individually replaced as needed and with very little effort.)
Configuring the detector
WARNING: do not do this without express permission from an officer. You can make changes that could be quite dangerous to yourself and your fellow volunteers.
Help! It's not reading gas levels
Symptom: instead of reading gas levels after turning on, the detector just shows four lowercase Bs.
Reason: the detector likely has a bump test frequency set, and it's set to a maximum of 7 days. After that time, it refuses to read gas levels until it's bump tested. This is infuriating.
Fix: See the manual for how to configure the detector. Specifically you'll want to set the bump test value to zero instead of one.
Help! I can't configure because a passcode is set
You can remove the passcode by entering 421 for the passcode (press and hold to increment by 10 at a time instead of one), then instead of entering the passcode, press and hold both the on/off button and the enter button for a second. It will remove the passcode and reset the detector to factory default settings. Now you can configure the detector as needed.
Manual
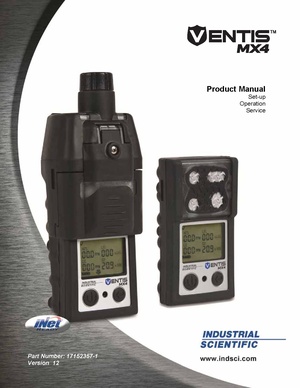
The instruction manual can be found here:


